Inputs
Overview
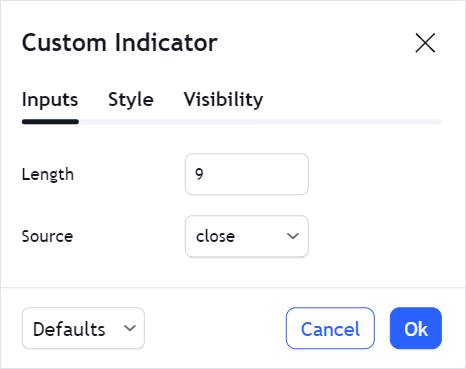
When you create a custom indicator, you can make some indicator parameters variable and allow users to adjust them in the UI. Such parameters are called input parameters or inputs. Users should provide values for the input parameters in the Inputs tab of the indicator settings dialog. Then, these values will be used in the indicator calculations.
For example, a custom indicator can accept a source symbol and length as input parameters.
To enable input parameters, you should take the following steps:
Define a list of input parameters
To define a list of input parameters, you should assign an array of objects to the inputs property in StudyMetaInfo.
custom_indicators_getter: function(PineJS) {
    return Promise.resolve([
        // Indicator object
        {
            // Define indicator metadata
            metainfo: {
                /* Other StudyMetaInfo properties */

                // Define input parameters
                inputs: [
                    /* A list of input objects */
                ]
            },
        }
    ]);
},
StudyMetaInfo is an interface that you should implement to provide metadata for the custom indicator. For more information, refer to the Metainfo article.
Input parameters can be of multiple types, including numeric, text, time, and others.
Therefore, each object in inputs should implement a certain interface depending on the parameter type. The table below contains frequently used interfaces:
| Interface | Definition |
|---|---|
StudyNumericInputInfo | Designed for numeric parameters. |
StudyTextInputInfo | Designed for parameters represented with text. For example, types of a smoothing line: SMA, EMA, and WMA. |
StudySourceInputInfo | Designed to specify values that are used to calculate the indicator. For example, open or close prices of the bars. |
StudySymbolInputInfo | Designed to specify a source symbol. |
Refer to StudyInputInfo for a complete list of interfaces.
Consider the following example. A custom indicator has two input parameters: length (a time period) and source (a type of bar values).
To specify these parameters, you should implement a StudyNumericInputInfo and StudySourceInputInfo objects, respectively.
Both interfaces have the following properties:
idthat is used to refer to the input parameternamethat specifies the parameter name in the Inputs tabtypethat specifies the parameter data typedefvalthat specifies the default parameter value
Other properties depend on the parameter type. The code sample below shows the implementation of the input parameters.
metainfo: {
    // ...
    inputs: [
        // StudyNumericInputInfo object
        {
            id: "length",
            name: "Length",
            defval: 9,       // 9 bars
            type: "integer",
            min: 1,
            max: 10000,
        },
        // StudySourceInputInfo object
        {
            id: "source",
            name: "Source",
            defval: "close", // Close price
            type: "source",
            options: [       // Options in the drop-down menu
                "open",
                "high",
                "low",
                "close",
                "hl2",
                "hlc3",
                "ohlc4",
            ],
        },
    ]
}
Specify default values
StudyMetaInfo contains the defaults property that stores default values for all indicator settings, including input parameters.
For each parameter defined in inputs, you should provide the corresponding value in defaults.
Your custom indicator will not work unless you provide values in defaults for each input parameter.
To specify default values, assign a StudyInputsSimple object to the inputs property in StudyDefaults.
StudyInputsSimple contains pairs of keys and values, where a key is a certain input parameter's id, and a value is the default value for this parameter.
In the previous section, you can see an example of the indicator with two input parameters: length and source. The code sample below demonstrates how to specify default input values for this indicator.
metainfo: {
    // ...
    inputs: [
        {
            id: "length", // This value is used as ID to refer to the input parameter
            // ...
        },
        {
            id: "source", // This value is used as ID to refer to the input parameter
            // ...
        },
    ]
    // StudyDefaults object
    defaults: {
        // ...
        inputs: {
            // ID : default value
            length: 9,
            source: "close",
        },
    }
}
Handle input values in the constructor
To create a custom indicator, you should implement a constructor that calculates indicator data.
In the constructor, you can retrieve input values and then use them in your data calculations.
To do this, use the inputCallback provided with main and init functions. The callback returns an array of input values arranged in the same order as in the inputs property.
In the Define a list of input parameters section, you can see an example of the indicator with two input parameters: length and source. The code sample below demonstrates how to get input values for this indicator.
constructor: function () {
    this.main = function(ctx, inputCallback) {
        // ...
        this._input = inputCallback;
        var length = this._input(0);
        var source = this._input(1);
    };
}